SpringCloud Ribbon 负载均衡
参考资料 官方文档地址 参考资料 SpringCloud实战微服务之——Ribbon详解
需要解决的问题
- 如何在配置 Eureka Client 注册中心时不去硬编码 Eureka Server 的地址?
- 在微服务不同模块间进行通信时,如何不去硬编码服务提供者的地址?
- 当部署多个相同微服务时,如何实现请求时的负载均衡?
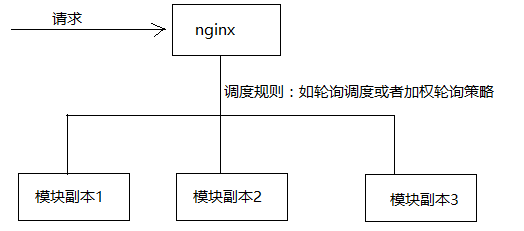
实现负载均衡方式1:通过服务器端实现负载均衡(nginx)
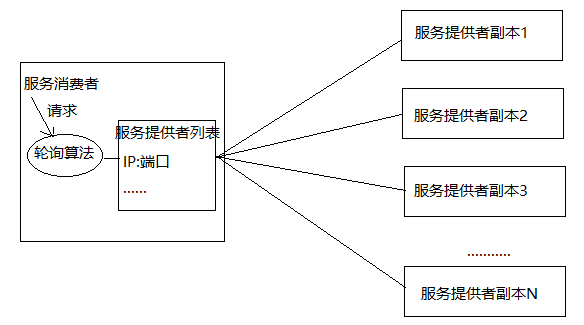
实现负载均衡方式2:通过客户端实现负载均衡。
Ribbon 是什么?
Ribbon 是 Netflix 发布的云中间层服务开源项目,其主要功能是提供客户端实现负载均衡算法。Ribbon 客户端组件提供一系列完善的配置项如连接超时,重试等。简单的说,Ribbon 是一个客户端负载均衡器,我们可以在配置文件中 Load Balancer 后面的所有机器,Ribbon 会自动的帮助你基于某种规则(如简单轮询,随机连接等)去连接这些机器,我们也很容易使用 Ribbon 实现自定义的负载均衡算法。
说白了就是用来处理负载均衡,例如订单服务可以使用多个服务器来共同面对高并发量,这时就需要使用负载均衡了,合理的把各个请求分摊到各个服务器上,不至于 “一核工作多核围观的” 的情况
下图展示了Eureka使用Ribbon时的大致架构:
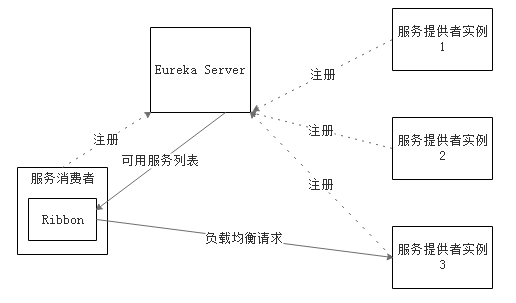
Ribbon 工作时分为两步:
第一步选择 Eureka Server,它优先选择在同一个 Zone且负载较少的 Server; 第二步再根据用户指定的策略,再从 Server取到的服务注册列表中选择一个地址。其中 Ribbon提供了很多策略,例如轮询round robin、随机Random、根据响应时间加权等。
注意:Ribbon 不是和 Eureka 强绑定的,其它的服务也可以使用
配置环境
<!-- https://mvnrepository.com/artifact/org.springframework.cloud/spring-cloud-starter-netflix-ribbon -->
<dependency>
    <groupId>org.springframework.cloud</groupId>
    <artifactId>spring-cloud-starter-netflix-ribbon</artifactId>
</dependency>
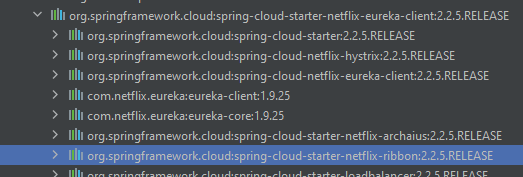
注意:实际上在 spring-cloud-starter-netflix-eureka-client 里面将包含了这个 ribbon 了,所以如果使用是 eureka 无需再次引入
<dependency>
    <groupId>org.springframework.cloud</groupId>
    <artifactId>spring-cloud-starter-netflix-eureka-client</artifactId>
</dependency>
需要需要负载均衡的服务名字要一样
spring:
  application:
    name: search
然后更改下客户端的代码(加上 @LoadBalanced 注解就能自动去加载负载均衡了)
@Bean
@LoadBalanced // 核心注解,一定要加上
public RestTemplate restTemplate(){
    return new RestTemplate();
}
然后调用就无需像上面那么麻烦了,直接在 ip 那里填上服务的名称,restTemplate 就会自动找到这个负载均衡的服务了
@GetMapping("/customer")
public String customer(){
    // 直接在 ip栏这里填上上面的那个服务名 search,这里的 /SEARCH 是路由地址(其实大小写都可以,不过使用大小比较容易区分)
    String response = restTemplate.getForObject("http://SEARCH/search", String.class);
    return "this is customer model use" + response;
}
负载均衡策略
只需随便在客户端找个地方(例如启动类)加上下面这个 IRule 这个 Bean,就能更改负载均衡策略了
注意:启动类里面内置了 @ComponentScan
@Bean
public IRule robbinRule() {
    // 随机策略
    return new RandomRule();
}
但是如果被 @ComponentScan 扫描到了这个规则,它会默认被当成全局规则,如果想要对某个服务进行定制化配置规则,最好配置到 @ComponentScan 扫描不到的地方去,具体细节看下面负载规则的替换那一节
IRule 接口
这个 IRule 是负载均衡策略的接口,主要是用于定义 LoadBalancer
public interface IRule{
    public Server choose(Object key);

    public void setLoadBalancer(ILoadBalancer lb);

    public ILoadBalancer getLoadBalancer();
}
它的实现类如下所示
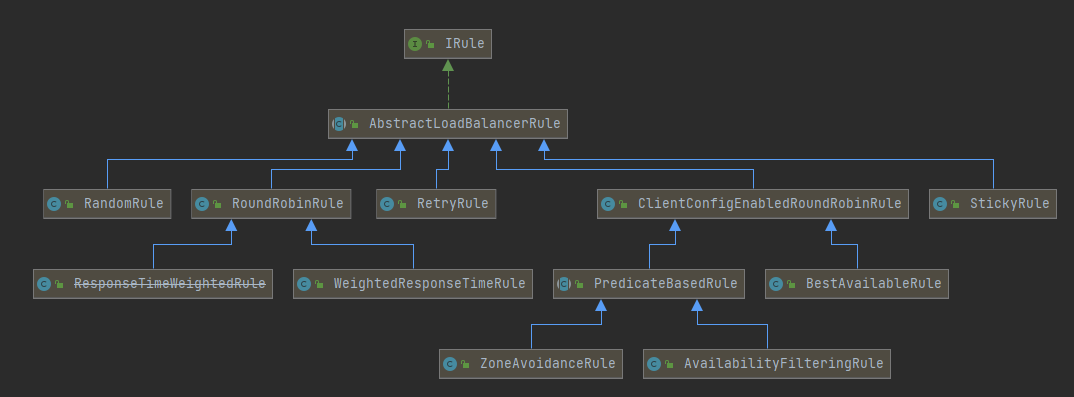
默认使用的就是 RoundRobbinRule(轮询策略)
常用策略
1、RandomRule:随机
2、RoundRobbinRule:轮询策略(默认)
3、WeightedResponseTimeRule:开始是轮询策略,后续会根据服务的响应时间,自动分配权重
4、BestAvailableRule:根据被调用方并发数最小的去分配(就是优先分发给被调用次数最少的)
负载规则的替换
配置 Ribbon 最简单的方式就是通过配置文件实现。
# 可以在配置文件为每个服务配置它专属的 Rule

# 指定需要更变策略的服务名称
search: # 服务1
  ribbon:
    NIWSServerListClassName: com.netflix.loadbalancer.ConfigurationBasedServerList
    NFLoadBalancerRuleClassName: com.netflix.loadbalancer.WeightedResponseTimeRule
provider:  # 服务2
  ribbon:
    NIWSServerListClassName: com.netflix.loadbalancer.ConfigurationBasedServerList
    NFLoadBalancerRuleClassName: com.netflix.loadbalancer.WeightedResponseTimeRule
具体配置方式参考 Spring cloud系列六 Ribbon的功能概述、主要组件和属性文件配置
当然我们也可以通过代码的方式来配置。
@Configuration
public class MySelfRule {
    @Bean
    public IRule myRule(){
        return new RandomRule();
    }
}
官方文档明确给出了警告:大体意思是对于 Ribbon 的配置必须用
@Configuration注解标识,并且不能被@Component注解或者@SpringBootApplication(因为里面包含了@ComponentScan)扫描到。因为如果被@ComponetScan扫描到会导致所有的 RibbonClient 都去共享这个配置,达不到特殊化定制的目的了
解决方案如下:
@EnableEurekaClient
@SpringBootApplication
@ComponentScan(
        basePackages = "com.alsritter",
        excludeFilters = {@ComponentScan.Filter(type = FilterType.ASSIGNABLE_TYPE, value = MySelfRule.class)}
)
public class ConsumerApplication {
    public static void main(String[] args) {
        SpringApplication.run(ConsumerApplication.class, args);
    }
}
创建一个 Ribbon 客户端的配置类,关联 BeanConfiguration,用 name 来指定调用的服务名称,代码如下所示:
@Configuration
// 如果多个服务可以选择不同的策略
/*@RibbonClients({
        @RibbonClient(name = "other",configuration = OtherConfig.class),
        @RibbonClient(name = "provider",configuration = ProviderConfig.class)
})*/
// 这里表示访问这个 provider-service 服务时采用上面配置的 MySelfRule 策略
@RibbonClient(name = "provider-service", configuration = MySelfRule.class)
public class RibbonConfig {

    @Bean
    @LoadBalanced // 核心注解
    public RestTemplate restTemplate(){
        return new RestTemplate();
    }

}
这时再次启动会发现变成了随机选择
轮询算法原理
轮询算法原理:
rest接口第几次请求数 % 服务器集群总数量 = 实际调用服务器位置下标(每次服务重启动后 rest 接口计数从1开始)
举例:
总服务集群数量:3
第 i 次请求

3 % 3 = 0 -> index = 0 list.get(index);
4 % 3 = 1 -> index = 1 list.get(index);
5 % 3 = 2 -> index = 2 list.get(index);
6 % 3 = 0 -> index = 0 list.get(index);
看完原理,再来分享一下源码,老规矩,去掉部分健壮性判断,保留核心代码
public Server choose(ILoadBalancer lb, Object key) {

    /* ... */

    Server server = null;
    int count = 0;

    while (server == null && count++ < 10) {
        // 取得可达的服务器
        List<Server> reachableServers = lb.getReachableServers();
        // 取得全部服务器
        List<Server> allServers = lb.getAllServers();

        int upCount = reachableServers.size();
        int serverCount = allServers.size();

        int nextServerIndex = incrementAndGetModulo(serverCount);
        server = allServers.get(nextServerIndex); // 取得当前使用哪个服务器

        // 为空的话则重新上面的过程
        if (server == null) {
            /* Transient. */
            Thread.yield(); // 这里其实不用管,暂时让出 CPU,实际影响不大
            continue;
        }

        if (server.isAlive() && (server.isReadyToServe())) {
            return (server);
        }
        // Next.
        server = null;
    }
    if (count >= 10) {
        log.warn("No available alive servers after 10 tries from load balancer: "
                + lb);
    }
    return server;
}

// 注意,这个 nextServerCyclicCounter 是原子 Integer 表示线程安全的,他就是用来访问计数用的
private AtomicInteger nextServerCyclicCounter;

// 为了线程安全以及效率,这里取模使用的是 CAS(乐观锁)
private int incrementAndGetModulo(int modulo) {
    // 这里是一段 CAS 锁
    for (;;) {
        int current = nextServerCyclicCounter.get();
        int next = (current + 1) % modulo;
        if (nextServerCyclicCounter.compareAndSet(current, next))
            return next;
    }
}